Dog Food; Screencast + Technical Blog Post
Getting Started with Nodal:
A node.js Framework + Screen-cast + Technical Blog Post
This post was the first version of a mixed-media technical blog format idea. You can find the next (better) version of this Nodal screen-cast + technical blog here
I dog-fooded this version and have a follow-up post on the results of the experiment here. Since this is a technical blog, and not a product distribution channel, I’m leaving this first version up, as a reference to the iterative development of this idea.
If you still want to cruise this post, it follows a screencast by the creator of the Nodal framework Keith Horwood. See that little check box in the right margin? Use it to toggle the accompanying screen-cast on which this blog post is based. If you’re curious about this mixed text-video transcription technical blog idea, you can see my motivations in this post.1
Nodal
Nodal is a node.js webserver and framework designed to make it easy to get a node.js server up and running. It’s built with:
- out-of-the-box integration with PostgreSQL
- an object relational model(ORM)
- abstractions and design patterns from rails and django
- a system of command line generators
- implementation using ES6 idioms and syntax
We’re going to use Nodal to create an API for a Twitter clone. The API will handle tweets, user creation and authentication.
Install
We’ll start with a fresh global install of Nodal to make Nodal generators available at the command line. If you want to see alternatives to global installation of node packages, and the rationale for that approach, you can read more here.
sudo npm install nodal -g
What are we using for this screen-cast + blog post
The Atom text editor.
Node version 4.2.4 with useful ES6 syntax. Need Node version management? I recommend using nvm.
Postgres integration with ORM. Need Postgres? I recommend using Postgres.app.
Create a new project
nodal new instatweet-api
Wait a few moments for it to install
$ cd instatweet-api
Start our server
$ run nodal s
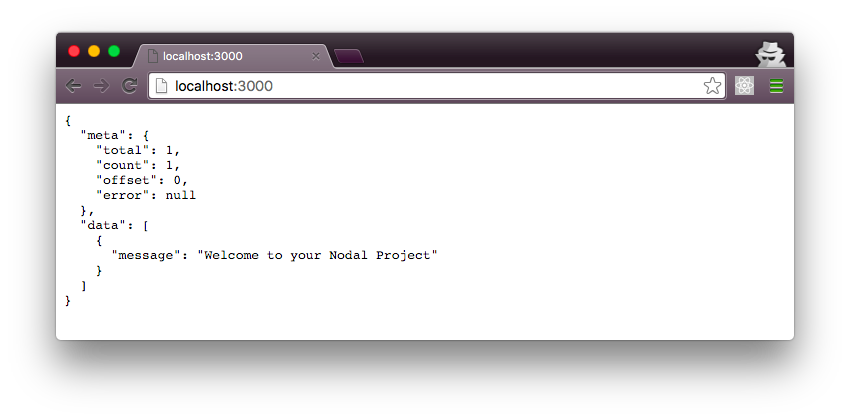
Should be available at localhost:3000
Let’s double check:
Our application Structure
Let’s go one step at a time to not get distracted by everything Nodal has generated for us.
Controllers
There’s a distracting implementation detail here which is the immediately-invoked-function-expression used as a wrapper for the controller.
//app/controllers/index_controller.js
module.exports = (function() {

  'use strict';

  const Nodal = require('nodal');

  ...

  return Index Controller;

})
If you’re looking for a discussion on IIFEs you can see a good and short conversation about it on Nodal’s Show HN discussion page. As far as this guide is concerned, it’s a red-herring.
The part we want to focus on is here:
Nodal starts us off with an IndexController.
//app/controllers/index_controller.js
class IndexController extends Nodal.Controller {
  get(){
    this.render(...)
  }
}
In response to a get request to / we respond with a template.
Nodal is designed to make APIs, not necessarily serving html, but this pattern of extending a Nodal class and defining methods on that class that invoke other Nodal methods that do the work of our API is consistent across all of our Nodal.
In fact, it’s this clear consistent pattern that really makes Nodal stand out as both easy to get started with, powerful enough to solve most of your problems out of the box and well organized enough to keep your server application logic easy to follow as you extend your server beyond what Nodal provides out of the box.
We’re interested in generating an API server. We need database integration. We need all these really complicated things that in a current choose-your-own adventure node ecosystem, it’s hard to get up and running.
Models: What’s a model?
Models are an abstraction that we can use in developing an API that helps us manage data being written to and read from our database. Models create language and syntax for describing the intent of our API in a way that is consistent between the javascript written in our server and the SQL queries that our server relies on to communicate consistently and reliably with our database. This is what model means in the term Object-Relational-Model(ORM).
Nodal gives us command line generator tools for creating models. Essentially, with a couple commands we can generate all the javascript needed to create an API end point that can do all our traditional CRUD operations in the server db.
$ nodal g:model Tweet user_id:int body:string
Models have a close relationship with two other concepts: schema and tables. A schema is a description of the relationships that exist between your data and the types of data we want to store. A table is the actual instance of that data, which adheres to the defined scheme.
In Nodal, we define the model, and then Nodal does the work to create a consistent interface between an API end point, our model, our schema and our actual data table in our postgres database.
Database: What’s a migration?
Nodal uses a specific design pattern for managing our database as we develop our application. This pattern is built on an abstraction called a migration.
Migrations offer a consistent and convenient way to alter your database schema over time. You can think of each migration as being a new version of the database. This is an idea borrowed from Ruby and Rails, and you can read an in-depth article on migrations in ruby here here
For our purposes, all we need to know is that our Nodal model generator went into our project and generated code that defined two useful methods on a Nodal javascript object that is able to manipulate our database. These methods are
//db/migrations/2016...UTCTimestamp.js
up(){
  return [
    this.createTable('tweets', [tableSchema]);
  ];
}

down(){
  return [
    this.dropTable('tweets');
  ]
}
Up will create a new tweets table using the schema we defined in the command line. Down will drop that table.
In this way we can roll our database forward, or backward if needed, as we develop our API.
Each time we use the generator to create a new model, we’ll create a new migrations file that contains up and down migrations representing the new tables needed to match our models, and an operation that will drop those new tables and return us to a previous version of our database.
Back to Models
Our command line generator created a model for us as well! Ignoring the red-herring boiler plate syntax and IIFE, we create a Tweet which extends Nodal.Model, we set the database using a wile in the db directory where I migration exists. And we set the schema for our Tweet using a property on the provided Nodal object.
//app/models/tweet.js

class Tweet extends Nodal.Model {}
Tweet.setDatabase(Nodal.require('db/main.js'))
Tweet.setSchema(Nodal.my.Schema.models.Tweet);

return Tweet;
At this point two questions might come to mind: What’s db/main.js? What’s Nodal.my.Schema.models.Tweet and when and where is it created?
These are both good questions. You can find an answer to question #1 by looking in db/main.js. You can find an answer you question #2 at Nodal’s docs for the .setSchema method!
In essence, Nodal.my.Schema.model.Tweets is an object that represents the schema for the model and the table. And it will be generated when we run our migrations. That is it gets created on an invocation of up()!
If it seems at this point like you don’t have enough granular control over the application, and you don’t know what’s happening under the hood of all these generator commands… well you aren’t alone.
The strength of Nodal is that it is opinionated. It gives you good quick answers to hard problems, as long as you do it the Nodal way. That’s the “easy to get started” part. And the choice of tools, design patterns and abstractions implemented not only make it easy to get started, but also powerful out of the box.
What I think makes Nodal FUN is that while it’s opinionated, it’s transparent enough in it’s methods and its design patterns that an experienced developer can extend Nodal, once they understand what’s going on.
Back to Migrations: Let’s get our model up and running
$ nodal db:create
This creates our postgres database.
$ nodal db:prepare
This empties out our database and prepares for migration
$ nodal db: migrate
This creates the tables in our database.
$ nodal db:rollback
This roll’s back our database to a prior migration
$ nodal db:migrate
Migrate will roll it forward again.
Every migration or rollback will print the schema of the current migration for us so we can keep track of what our database looks like at any moment.
Question: When we migrate and rollback, do we lose all the data contained in our database in those prior migrations.
My suspicion is no, but this takes MORE RESEARCH!
Questions: When we db:create or db:prepare, do we lose all the data contained in our database prior to that create or prepare?
My suspicion is no, but this takes MORE RESEARCH!
Back to Controllers: Let’s make an api endpoint
$ nodal g:controller v1 --for:Tweet
Now this is pretty awesome. The Nodal generators are smart enough to know that Tweet is a model that we’ve already created.
Additionally, we can actually create a namespace for our model, which will a string that gets added to the URL path for our API end point. In this case “v1” is our namespace, which will give us a tweet url that we can access at localhost:3000/v1/tweet
As we build features of our API, we can use namespaces to organize those API end points. Practically speaking we could develop v2 of our API, while still maintaining v1 in production.
As a reminder, the we created the Tweet model, which we reference with the Nodal command line option –for:Tweet a few minutes ago with:
$ nodal g:model Tweet user_id:int body:string
That command not only generated a model for us, but also generated our migration! One challenge with getting started with Nodal is getting familiar with the suite of command line generator functions and options, as well as keeping track of everything the generators do under the hood.
So what does g:controller v1 –for:Tweet get us?
If we ignore the boiler plate, we import the Tweet model, and then use it to handle queries with standard methods: index, show, create, update and destroy. These methods are just simple CRUD operations, and the design pattern is based on frameworks like rails.
Before we get into breaking down the code that the Nodal command line created, let’s see if we can hit this endpoint?
Using Postman, or curl, or whatever your favorite way to test an API endpoint, lets hit localhost:8000/v1/tweets with a get request!
{
  "meta": {
      "total":0,
      "count":0
      "offset": 0,
      "error": null
    },
  "data": []
}
I think this is a cute point in the demo, because while we were focusing on the inner workings of what was being generator, Nodal’s generator had already given us everything we needed to reach our goal, which is a simple functional API end point!
Router
What was actually happening when we hit that tweets endpoint?
Our generator commands modified app/router.js and demarcated the modifications with some very explicit comments. Here’s the bit to focus on:
//app/router.js

/* generator: begin imports */

const V1TweetsController = Nodal.require('app/controllers/v1/tweets_controller.js');

/* generator: end imports */


...

/* generator: begin routes */

router.route(/^\/v1\/tweets\/?/, V1TweetsController);

/* generator: end routes */


//app/controllers/v1/tweets_controller.js

const Tweet = Nodal.require('app/models/tweet.js')
Testing the endpoint
What if we send a POST request to /v1/tweets?
[insert screen shot of postman post request]
The /v1/tweets endpoint handled our empty POST request! What did it do?
Well first off our POST request gets a response from the server with JSON representing the data that we just posted to our database using our tweet model, as well as an updated “meta” object!
 {
  "meta": {
    "count": 1,
    "offset": 0,
    "error": null
  },
  "data": [
    {
      "id": 1,
      "user_id": null,
      "body": null,
      "created_at": "2016-03-04T08:46:18.069Z"
    }
  ]
}
Creating tweets with actual content
Let’s keep on hitting the API with post requests containing some other text in the body:
“Hey”
“Hello”
“Hello, world!”
“Goodbye, world!”
“Goodbye, friend!”
“Hello, friend!”
We know we can create things. Cool!
API Input Validation
So let’s say we wanted to validate any POST request that our API is handling? Nodal provides validation!
In our tweet model, we can add validation using the .validates method, which takes the field to validate, the text string to respond with in the case that validation fails, and an anonymous function that will evaluate to true or false using the data in the designated input field.
Let’s validate the body of our POST request to make sure that it both exists and is longer than 5 characters.
//app/models/tweet.js

Tweet.validates('body', 'must be at least 5 characters', v => v && v.length => 5)
Then let’s test it!
Let’s POST “Hey!”
[screen shot]
And we get a validation error!
Now let’s POST “Heyooo!”
[screen shot]
And it works.
Getting all of our tweets, and query strings
If we hit localhost:3000/v1/tweets with a get request, we’ll get all of our tweets back to us in the body of the response.
Nodal comes with support for multiple useful query strings right off the bat.
Let’s test a couple.
localhost:3000/v1/tweets?body__not_null

localhost:3000/v1/tweets?body__startswith=he
Doesn’t work! Because the query is case sensitive.
localhost:3000/v1/tweets?body__startswith=He

localhost:3000/v1/tweets?body__endswith=friend!
For case insensetive we use iendswith:
localhost:3000/v1/tweets?body__iendswith=frieNd!
For integer values, we can do greater-than-or-equal-to queries
localhost:3000/v1/tweets?id__gte=3
This will give us a response containing all tweets for which the ID is greater-than-or-equal-to 3!
localhost:3000/v1/tweets?id__gte=3&__count=2

localhost:3000/v1/tweets?id__gte=3&__offset=2&__count=2
How’s this all working? Is this magic, or does the developer have fine grained control?
If we look in our tweets_controller.js file, what we see(ignoring all the autogenerated boilerplate) is the chain of methods invoked on the query params
//app/controllers/v1/tweets_controller.js

class V1TweetsController extends Nodal.Controller {
  index(){
    Tweet.query()
       .where(this.params.query)
       .end((err, models) => {

          this.respond(err || models);

      });
  }
}
We can actually specify conditions for the response directly as option hash properties to .where()
.where({id__gte: 3})
Now no matter our query string, we’ll only get tweets that match the option hash passed to .where
[screenshot]
Ultimately the developer does have fine grained control. Nodal is built to be interacted with from the client very easily.
The query string and .where option hash argument syntax is borrowed directly from Django’s ORM.
Deleting Our Tweets
Using the exact same query string we can also DELETE a tweet using a DELETE request:
localhost:3000/v1/tweets/7
The Nodal server will respond with the tweet we’re deleting, which is the tweet with ID 7.
[copy-paste response snippet]
Let’s double check by sending another DELETE request using the same query string:
localhost:3000/v1/tweets/7

[copy-paste response snippet]
If we send a get questions to localhost:3000/v1/tweets we’ll see that our tweet with ID 7 is gone.
We can also go back through our server log, which is active in the terminal window where we started our nodal server, and we can see the log of the tweet being deleted.
[screenshot or copy-paste of log]
That’s Enough to Get Started
This is enough to get started using Nodal. The goal of these Nodal tutorials is to introduce you to Nodal’s command line generator methods while also highlighting the structure of a Nodal server and the code that the generator methods write into your server.
The ultimate goal isn’t just to learn the generator methods, but instead to empower a developer to pick up where the generators leave off and quickly build out a fully functional Node based API.
We’ll go deeper into how to extend the generated code in part 2 where we create a user model and user authentication for our API.
As a sneak peak here’s how we generate our user model, using the same g:model command, but now with a new flag –user…
nodal g:model --user
…which will generate a new migration that contains our user table, add default validation for usernames and password inputs and download bcrypt for password encryption.
Follow me on twitter for part 2 and part 3.
The Origional Screen-Cast
1: This is a sample footnote.